IoC控制反转
- 反转的是获取对象的方式。
- 传统
new对象,SpringIoC容器只需要getBean("obj")从容器中获取(applicationContext.xml) - 为了方便理解,IoC改名为DI依赖注入
两种理解:
- 控制反转:将创建对象、属性值的方式 进行了反转,从
new、setObj()反转为了 从springIoC容器getBean() - 依赖注入:将属性值注入给了属性,将属性注入给了
bean,将bean注入给了IoC容器
案例
创建Student实例类
package com.moluuser.entity;

public class Student {
    private int stuNo;
    private String stuName;
    private int stuAge;

    public int getStuNo() {
        return stuNo;
    }

    public void setStuNo(int stuNo) {
        this.stuNo = stuNo;
    }

    public String getStuName() {
        return stuName;
    }

    public void setStuName(String stuName) {
        this.stuName = stuName;
    }

    public int getStuAge() {
        return stuAge;
    }

    public void setStuAge(int stuAge) {
        this.stuAge = stuAge;
    }

    @Override
    public String toString() {
        return "Student{" +
                "stuNo=" + stuNo +
                ", stuName='" + stuName + '\'' +
                ", stuAge=" + stuAge +
                '}';
    }
}
applicationContext.xml
<?xml version="1.0" encoding="UTF-8"?>
<beans xmlns="http://www.springframework.org/schema/beans"
       xmlns:xsi="http://www.w3.org/2001/XMLSchema-instance"
       xsi:schemaLocation="http://www.springframework.org/schema/beans http://www.springframework.org/schema/beans/spring-beans.xsd">
<bean id="student" class="com.moluuser.entity.Student">
    <property name="stuName" value="zs"></property>
    <property name="stuAge" value="18"></property>
    <property name="stuNo" value="5"></property>
</bean>
</beans>
测试类
package com.moluuser.text;

import com.moluuser.entity.Student;
import org.springframework.context.ApplicationContext;
import org.springframework.context.support.ClassPathXmlApplicationContext;

import java.applet.AppletContext;

public class Text {
    public static void main(String[] args) {
        ApplicationContext context = new ClassPathXmlApplicationContext("applicationContext.xml");
        Student student = (Student) context.getBean("student");
        System.out.println(student.toString());
    }
}
Add
创建IoC
public class Client {
    /**
     * 获取spring的Ioc核心容器,并根据id获取对象
     *
     * ApplicationContext的三个常用实现类:
     *      ClassPathXmlApplicationContext:它可以加载类路径下的配置文件,要求配置文件必须在类路径下。不在的话,加载不了。(更常用)
     *      FileSystemXmlApplicationContext:它可以加载磁盘任意路径下的配置文件(必须有访问权限)
     *
     *      AnnotationConfigApplicationContext:它是用于读取注解创建容器的,是明天的内容。
     *
     * 核心容器的两个接口引发出的问题:
     *  ApplicationContext:     单例对象适用              采用此接口
     *      它在构建核心容器时,创建对象采取的策略是采用立即加载的方式。也就是说,只要一读取完配置文件马上就创建配置文件中配置的对象。
     *
     *  BeanFactory:            多例对象使用
     *      它在构建核心容器时,创建对象采取的策略是采用延迟加载的方式。也就是说,什么时候根据id获取对象了,什么时候才真正的创建对象。
     * @param args
     */
    public static void main(String[] args) {
        //1.获取核心容器对象
        ApplicationContext ac = new ClassPathXmlApplicationContext("bean.xml");
//        ApplicationContext ac = new FileSystemXmlApplicationContext("C:\\Users\\zhy\\Desktop\\bean.xml");
        //2.根据id获取Bean对象
        IAccountService as  = (IAccountService)ac.getBean("accountService");
        IAccountDao adao = ac.getBean("accountDao",IAccountDao.class);

        System.out.println(as);
        System.out.println(adao);
        as.saveAccount();
    }
}
bean作用范围
bean的作用范围调整
bean标签的scope属性:
    作用:用于指定bean的作用范围
    取值: 常用的就是单例的和多例的
        singleton:单例的(默认值)
        prototype:多例的
        request:作用于web应用的请求范围
        session:作用于web应用的会话范围
        global-session:作用于集群环境的会话范围(全局会话范围),当不是集群环境时,它就是session
bean生命周期
bean对象的生命周期
单例对象
    出生:当容器创建时对象出生
    活着:只要容器还在,对象一直活着
    死亡:容器销毁,对象消亡
    总结:单例对象的生命周期和容器相同
多例对象
    出生:当我们使用对象时spring框架为我们创建
    活着:对象只要是在使用过程中就一直活着。
    死亡:当对象长时间不用,且没有别的对象引用时,由Java的垃圾回收器回收
依赖注入
IoC容器赋值
- 如果是简单类型(8个基本+String),value;
- 如果是对象类型,ref="需要引用的id值",因此实现了对象与对象之间的依赖关系。
- 在IoC中定义bean的前提:该bean的类必须提供了无参构造
    <bean id="teacher" class="com.moluuser.entity.Teacher">
        <property name="name" value="ls"></property>
        <property name="student" ref="student"></property>
    </bean>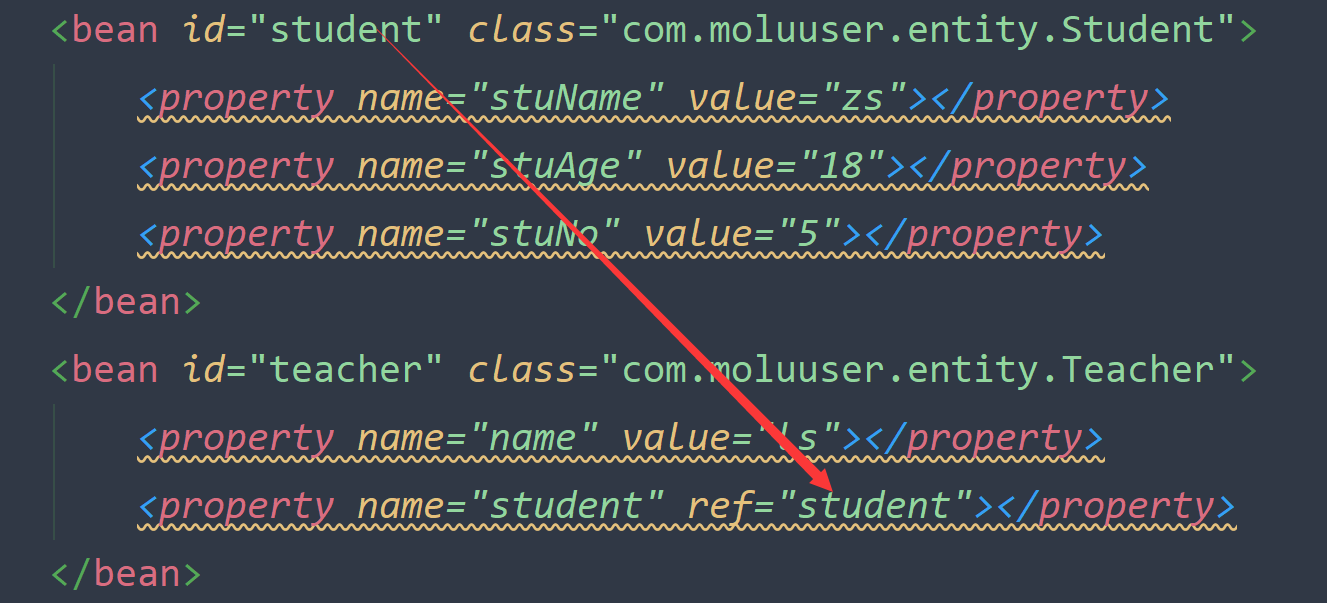
set注入
通过 setObj()赋值
默认使用的是set方法(),依赖注入底层是通过反射实现的。
使用 </property>
构造器注入
通过构造方法赋值<constructor-arg value="ls" type="String" index="0" name="name"></constructor-arg>
- 注意:如果
<constructor-arg>的顺序与构造方法参数的顺序不一致,则需要通过type或index或name指定。
p命名空间注入
在beans标签中加入xmlns:p="http://www.springframework.org/schema/p"
使用以下语句赋值
<bean id="teacher" class="com.moluuser.entity.Teacher" p:name="zs" p:student-ref="student"></bean>集合赋值
- 注入各种集合数据类型: List Set map properties...
- set、list、数组各自都有自己的标签<
set> <list> <array>,但是也可以混着用
注入案例
<?xml version="1.0" encoding="UTF-8"?>
<beans xmlns="http://www.springframework.org/schema/beans"
       xmlns:xsi="http://www.w3.org/2001/XMLSchema-instance"
       xsi:schemaLocation="http://www.springframework.org/schema/beans
        http://www.springframework.org/schema/beans/spring-beans.xsd">

    <!-- spring中的依赖注入
        依赖注入:
            Dependency Injection
        IoC的作用:
            降低程序间的耦合(依赖关系)
        依赖关系的管理:
            以后都交给spring来维护
        在当前类需要用到其他类的对象,由spring为我们提供,我们只需要在配置文件中说明
        依赖关系的维护:
            就称之为依赖注入。
         依赖注入:
            能注入的数据:有三类
                基本类型和String
                其他bean类型(在配置文件中或者注解配置过的bean)
                复杂类型/集合类型
             注入的方式:有三种
                第一种:使用构造函数提供
                第二种:使用set方法提供
                第三种:使用注解提供(明天的内容)
     -->


    <!--构造函数注入:
        使用的标签:constructor-arg
        标签出现的位置:bean标签的内部
        标签中的属性
            type:用于指定要注入的数据的数据类型,该数据类型也是构造函数中某个或某些参数的类型
            index:用于指定要注入的数据给构造函数中指定索引位置的参数赋值。索引的位置是从0开始
            name:用于指定给构造函数中指定名称的参数赋值                                        常用的
            =============以上三个用于指定给构造函数中哪个参数赋值===============================
            value:用于提供基本类型和String类型的数据
            ref:用于指定其他的bean类型数据。它指的就是在spring的Ioc核心容器中出现过的bean对象

        优势:
            在获取bean对象时,注入数据是必须的操作,否则对象无法创建成功。
        弊端:
            改变了bean对象的实例化方式,使我们在创建对象时,如果用不到这些数据,也必须提供。
    -->
    <bean id="accountService" class="com.moluuser.service.impl.AccountServiceImpl">
        <constructor-arg name="name" value="泰斯特"></constructor-arg>
        <constructor-arg name="age" value="18"></constructor-arg>
        <constructor-arg name="birthday" ref="now"></constructor-arg>
    </bean>

    <!-- 配置一个日期对象 -->
    <bean id="now" class="java.util.Date"></bean>


    <!-- set方法注入                更常用的方式
        涉及的标签:property
        出现的位置:bean标签的内部
        标签的属性
            name:用于指定注入时所调用的set方法名称
            value:用于提供基本类型和String类型的数据
            ref:用于指定其他的bean类型数据。它指的就是在spring的Ioc核心容器中出现过的bean对象
        优势:
            创建对象时没有明确的限制,可以直接使用默认构造函数
        弊端:
            如果有某个成员必须有值,则获取对象是有可能set方法没有执行。
    -->
    <bean id="accountService2" class="com.moluuser.service.impl.AccountServiceImpl2">
        <property name="name" value="TEST" ></property>
        <property name="age" value="21"></property>
        <property name="birthday" ref="now"></property>
    </bean>


    <!-- 复杂类型的注入/集合类型的注入
        用于给List结构集合注入的标签:
            list array set
        用于个Map结构集合注入的标签:
            map  props
        结构相同,标签可以互换
    -->
    <bean id="accountService3" class="com.moluuser.service.impl.AccountServiceImpl3">
        <property name="myStrs">
            <set>
                <value>AAA</value>
                <value>BBB</value>
                <value>CCC</value>
            </set>
        </property>

        <property name="myList">
            <array>
                <value>AAA</value>
                <value>BBB</value>
                <value>CCC</value>
            </array>
        </property>

        <property name="mySet">
            <list>
                <value>AAA</value>
                <value>BBB</value>
                <value>CCC</value>
            </list>
        </property>

        <property name="myMap">
            <props>
                <prop key="testC">ccc</prop>
                <prop key="testD">ddd</prop>
            </props>
        </property>

        <property name="myProps">
            <map>
                <entry key="testA" value="aaa"></entry>
                <entry key="testB">
                    <value>BBB</value>
                </entry>
            </map>
        </property>
    </bean>
</beans>
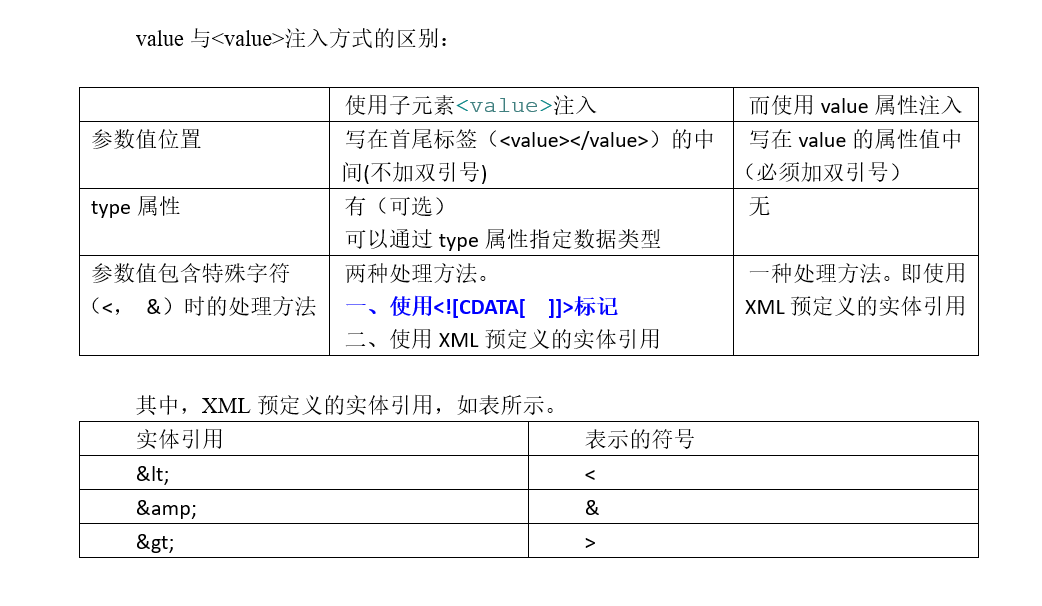
两种注入方式区别

and
给对象类型赋值 null
        <property name="name" >
                <null/>       -->注意 没有<value>
        </property>
赋空值 ""
        <property name="name" >
                <value></value>
        </property>
自动装配
- 用
ref才可以,基本类型不行<bean ... class="com.moluuser.entity.Course" autowire="byName|byType|constructor|no" >(byName本质是byId) - byName:自动寻找:其他bean的id值=该Course类的属性名
- byType:其他bean的类型(class) 是否与 该Course类的ref属性类型一致 (注意,此种方式必须满足:当前IoC容器中,只能有一个Bean满足条件)
- constructor:其他bean的类型(class) 是否与该Course类的构造方法参数的类型一致;此种方式的本质就是byType
可以在头文件中一次性将该IoC容器的所有bean 统一设置成自动装配:
<beans xmlns="http://www.springframework.org/schema/beans"
...
default-autowire="byName">
自动装配虽然可以减少代码量,但是会降低程序的可读性,使用时需要谨慎。
使用注解定义bean
通过注解的形式将bean以及相应的属性值放入IoC容器
扫描器
<context:component-scan base-package="com.moluuser.dao">`</context:component-scan>Spring在启动的时候,会根据base-package在 该包中扫描所有类,查找这些类是否有注解 @Component("studentDao")`,如果有,则将该类加入Spring IoC容器。
- 等价写法
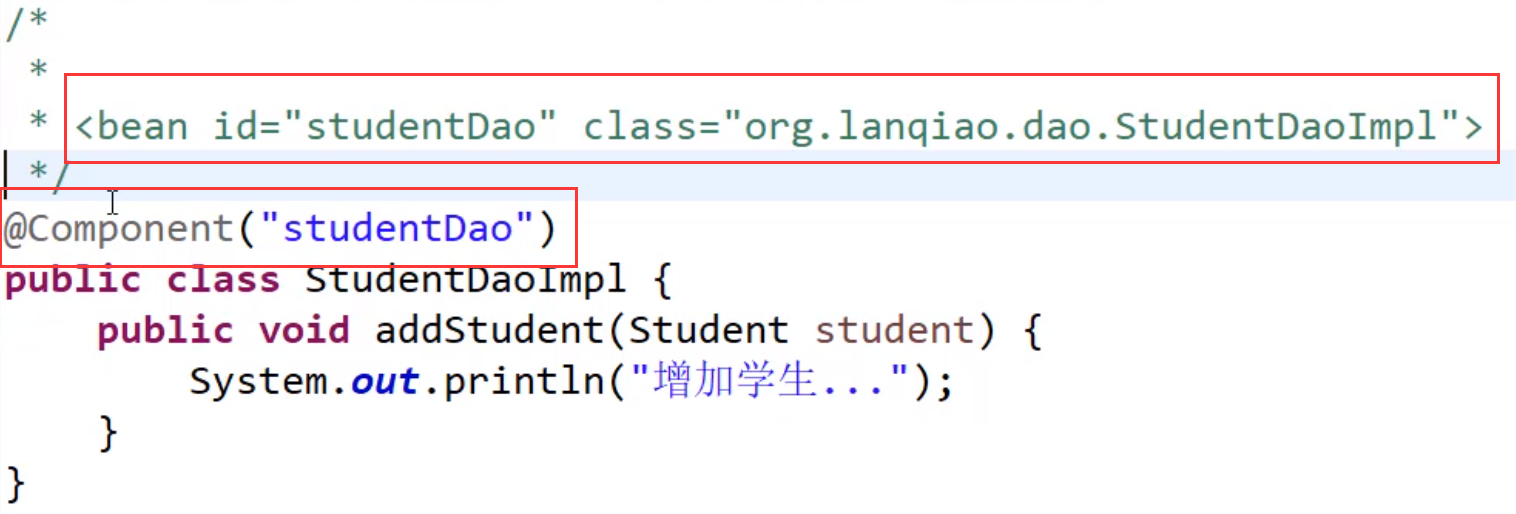
创建对象的注解
@Component范围大,可以细化:
- dao层注解:
@Repository - service层注解:
@Service - 控制器层注解:
@Controller
用于创建对象的
  他们的作用就和在XML配置文件中编写一个<bean>标签实现的功能是一样的
  Component:
      作用:用于把当前类对象存入spring容器中
      属性:
          value:用于指定bean的id。当我们不写时,它的默认值是当前类名,且首字母改小写。
  Controller:一般用在表现层
  Service:一般用在业务层
  Repository:一般用在持久层
  以上三个注解他们的作用和属性与Component是一模一样。
  他们三个是spring框架为我们提供明确的三层使用的注解,使我们的三层对象更加清晰
注入数据的注解
用于注入数据的
  他们的作用就和在xml配置文件中的bean标签中写一个<property>标签的作用是一样的
  Autowired:
      作用:自动按照类型注入。只要容器中有唯一的一个bean对象类型和要注入的变量类型匹配,就可以注入成功
            如果IoC容器中没有任何bean的类型和要注入的变量类型匹配,则报错。
            如果Ioc容器中有多个类型匹配时:
      出现位置:
          可以是变量上,也可以是方法上
      细节:
          在使用注解注入时,set方法就不是必须的了。
  Qualifier:
      作用:在按照类中注入的基础之上再按照名称注入。它在给类成员注入时不能单独使用。但是在给方法参数注入时可以(稍后我们讲)
      属性:
          value:用于指定注入bean的id。
  Resource
      作用:直接按照bean的id注入。它可以独立使用
      属性:
          name:用于指定bean的id。
  以上三个注入都只能注入其他bean类型的数据,而基本类型和String类型无法使用上述注解实现。
  另外,集合类型的注入只能通过XML来实现。

  Value
      作用:用于注入基本类型和String类型的数据
      属性:
          value:用于指定数据的值。它可以使用spring中SpEL(也就是spring的el表达式)
                  SpEL的写法:${表达式}
改变作用范围的注解
用于改变作用范围的
  他们的作用就和在bean标签中使用scope属性实现的功能是一样的
  Scope
      作用:用于指定bean的作用范围
      属性:
          value:指定范围的取值。常用取值:singleton prototype
生命周期相关注解
和生命周期相关
  他们的作用就和在bean标签中使用init-method和destroy-methode的作用是一样的
  PreDestroy
      作用:用于指定销毁方法
  PostConstruct
      作用:用于指定初始化方法
新注解
@Configuration
作用: 用于指定当前类是一个spring配置类,当创建容器时会从该类上加载注解。获取容器时需要使用AnnotationApplicationContext(有@Configuration注解的类.class)。
属性: value:用于指定配置类的字节码

@ComponentScan
作用: 用于指定spring在初始化容器时要扫描的包。作用和在spring的xml配置文件中的: <context:component-scan base-package="com.itheima"/>是一样的。
属性: basePackages:用于指定要扫描的包。和该注解中的value属性作用一样。

@Bean
作用: 该注解只能写在方法上,表明使用此方法创建一个对象,并且放入spring容器。
属性: name:给当前@Bean注解方法创建的对象指定一个名称(即bean的id)。

@PropertySource
作用: 用于加载.properties文件中的配置。例如我们配置数据源时,可以把连接数据库的信息写到properties配置文件中,就可以使用此注解指定properties配置文件的位置。
属性: value[]:用于指定properties文件位置。如果是在类路径下,需要写上classpath:

@Import
作用: 用于导入其他配置类,在引入其他配置类时,可以不用再写@Configuration注解。当然,写上也没问题。
属性: value[]:用于指定其他配置类的字节码。
AOP面向切面
作用: 在程序运行期间,不修改源码对已有方法进行增强。
优势: 减少重复代码 提高开发效率 维护方便
相关术语
Joinpoint(连接点): 所谓连接点是指那些被拦截到的点。在spring中,这些点指的是方法,因为spring只支持方法类型的连接点。

Pointcut(切入点): 所谓切入点是指我们要对哪些Joinpoint进行拦截的定义。

Advice(通知/增强): 所谓通知是指拦截到Joinpoint之后所要做的事情就是通知。 通知的类型:前置通知,后置通知,异常通知,最终通知,环绕通知。

Introduction(引介): 引介是一种特殊的通知在不修改类代码的前提下, Introduction可以在运行期为类动态地添加一些方法或Field。

Target(目标对象): 代理的目标对象。

Weaving(织入): 是指把增强应用到目标对象来创建新的代理对象的过程。 spring采用动态代理织入,而AspectJ采用编译期织入和类装载期织入。

Proxy(代理): 一个类被AOP织入增强后,就产生一个结果代理类。

Aspect(切面): 是切入点和通知(引介)的结合。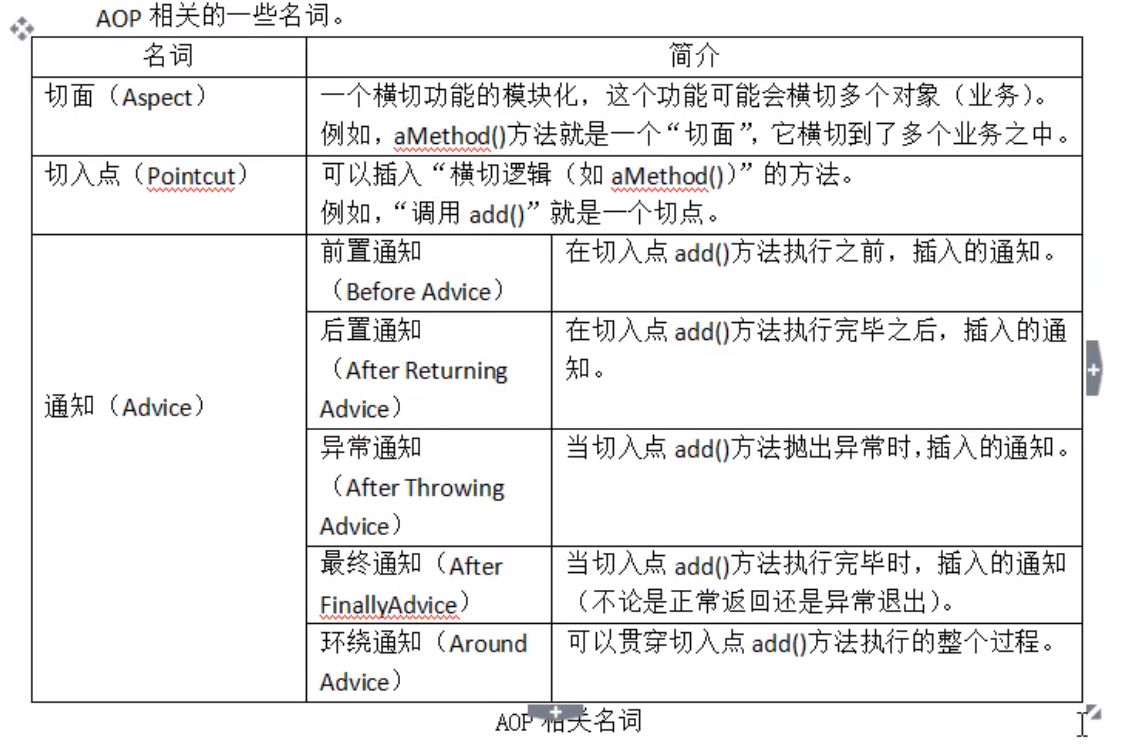
接口实现AOP
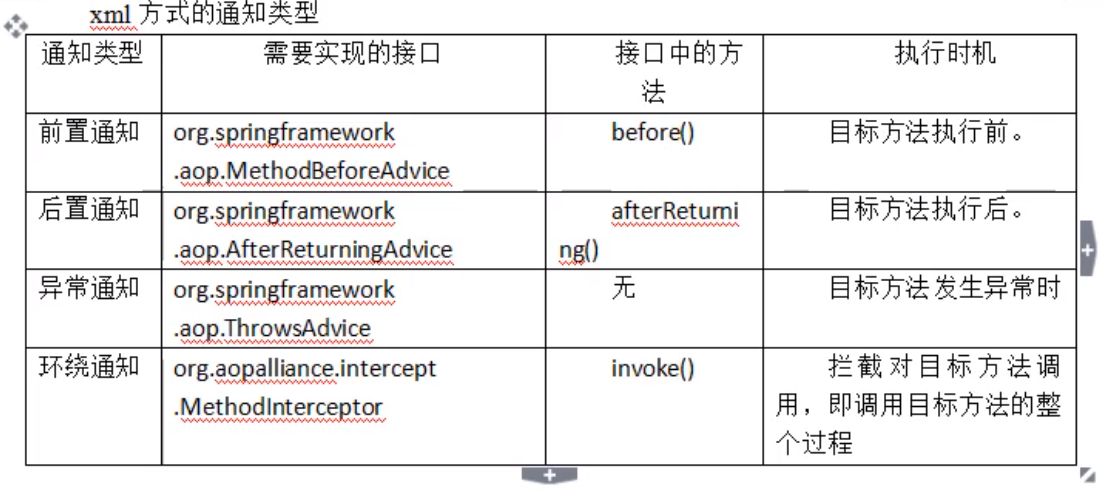
配置 appclicationContext.xml
    <aop:config>
<!--        切入点-->
        <aop:pointcut id="" expression=""/>
<!--        关联切面-->
        <aop:advisor advice-ref=""></aop:advisor>
    </aop:config>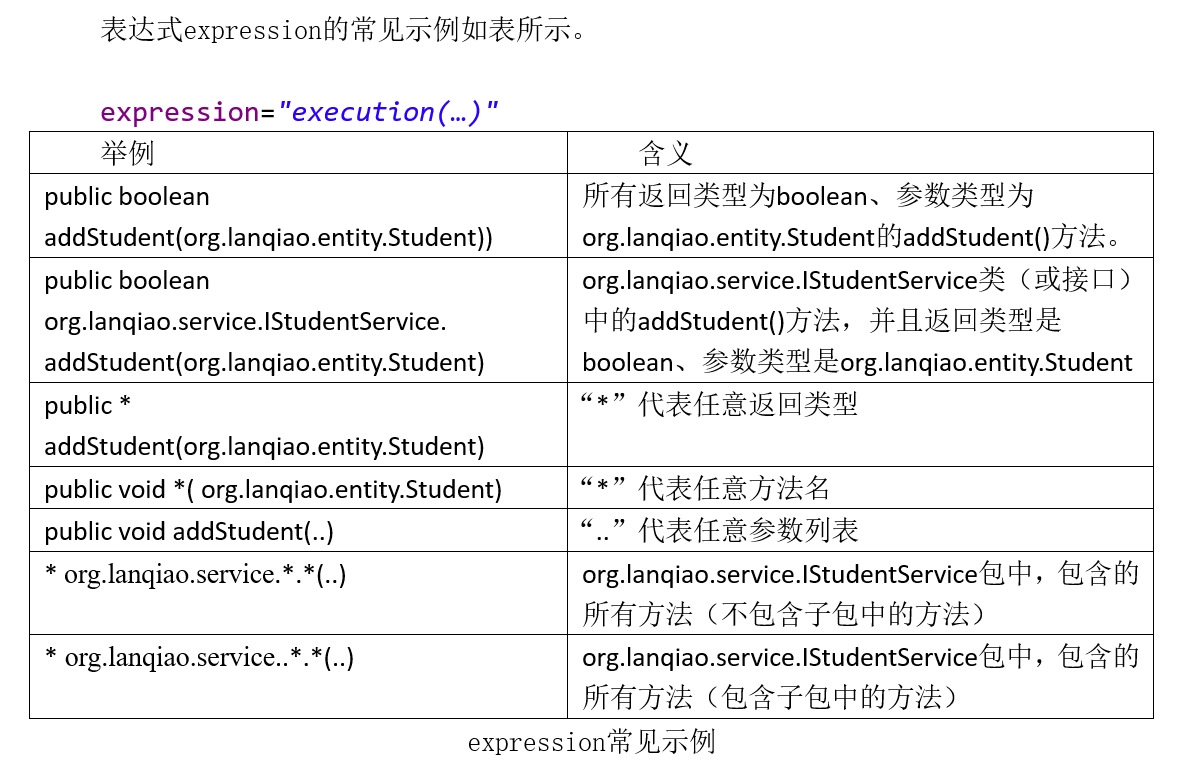
- 环绕通知:在目标方法的前后、异常发生时、最终等各个地方都可以进行的通知,最强大的一个通知。可以获取目标方法的 全部控制权(目标方法是否执行、执行之前、执行之后、参数、返回值等)在使用环绕通知时,目标方法的一切信息都可以通过invocation参数获取到环绕通底层是通过拦截器实现的。
注解实现AOP
@Aspect  //声明该类是一个通知
public class LogBeforeAnnotation  {

}- 注意:通过注解形式将对象增加到IoC容器时,需要设置扫描器
<context:component-scan base-package="com.moluuser.aop"></context:component-scan> - 扫描器会将指定的包中的
@Componet @Service @Respository @Controller修饰的类产生的对象增加到IoC容器中 @Aspect不需要加入扫描器,只需要开启即可:<aop:aspectj-autoproxy></aop:aspectj-autoproxy>- 通过注解形式实现的AOP,如果想获取目标对象的一些参数,则需要使用一个对象:
JointPoint
注解形式的返回值
声明返回值的参数名
    @AfterReturning(pointcut = "execution(public * addStudent(..))", returning = "returningValue")
    public void myAfter(JoinPoint jp, Object returningValue) {
        //returningValue是返回值,但需要告诉spring
        System.out.println("返回值:" + returningValue);
配置实现 类->通知
- 基于Schema配置
- 接口方式通知:
public class LogAfter implements AfterReturningAdvice() Schema方式通知:
- 编写一个普通类
public class LogAfter {} - 将该类通过配置,转为一个"通知"
- 编写一个普通类
Spring开发Web
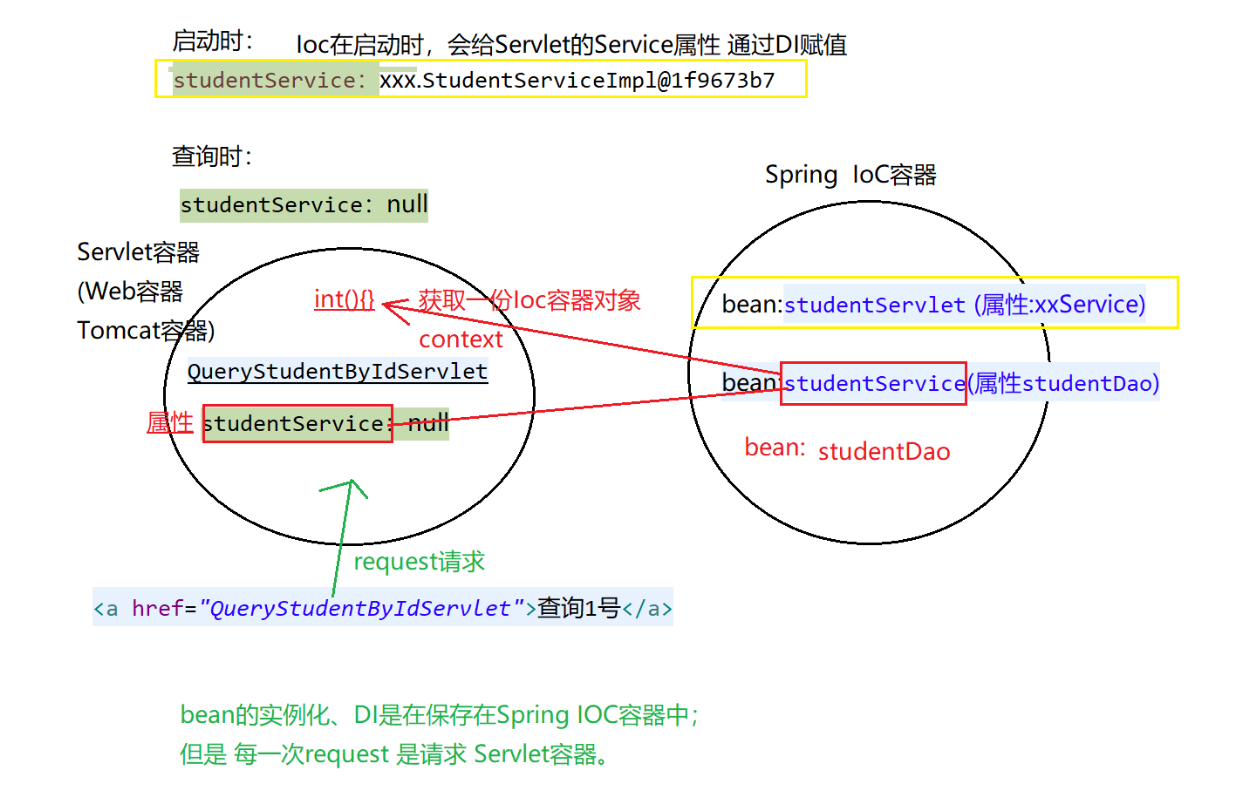
- 当服务启动时(tomcat),通过监听器将SpringIoC容器初始化一次(该监听器 spring-web.jar已经提供)
在 web.xml中配置
<!DOCTYPE web-app PUBLIC
 "-//Sun Microsystems, Inc.//DTD Web Application 2.3//EN"
 "http://java.sun.com/dtd/web-app_2_3.dtd" >

<web-app>
  <display-name>Archetype Created Web Application</display-name>
  <context-param>
<!--    配置容器配置文件的位置-->
    <param-name>contextConfigLocation</param-name>
    <param-value>applicationContext.xml</param-value>
  </context-param>
<listener>
<!--  配置监听器,服务启动时初始化IoC容器-->
  <listener-class>org.springframework.web.context.ContextLoaderListener</listener-class>
</listener>
</web-app>
拆分Spring配置文件
Web项目:根据什么拆分?
三层结构
UI(html/css/jsp,Servlet):applicationController.xml
Service:applicationService.xml
Dao:applicationDao.xml
公共数据库:applicationDB.xml
功能结构
学生相关配置 applicationContextStudent.xml <bean id="" class="X...Student">
班级相关配置 applicationContextClass.xml
合并:如何将多个配置文件加载
第一种
<context-param>
          <!--  监听器的父类ContextLoader中有一个属性contextConfigLocation,该属性值 保存着 容器配置文件applicationContext.xml的位置 -->
  <param-name>contextConfigLocation</param-name>
          <param-value>
              classpath:applicationContext.xml,
              classpath:applicationContext-Dao.xml,
              classpath:applicationContext-Service.xml,
              classpath:applicationContext-Controller.xml
          </param-value>
</context-param>
第二种
<context-param>
          <!--  监听器的父类ContextLoader中有一个属性contextConfigLocation,该属性值 保存着 容器配置文件applicationContext.xml的位置 -->
          <param-name>contextConfigLocation</param-name>
          <param-value>
              classpath:applicationContext.xml,
              classpath:applicationContext-*.xml
          </param-value>
</context-param>
第三种
只在
web.xml中加载主配置文件<param-value> classpath:applicationContext.xml </param-value>- 然后在主配置问加中,加载其他配置文件
<import resource="applicationContext-*.xml"/>
Servlet容器和SpringIoC的桥梁
版权属于:moluuser
本文链接:https://archive.moluuser.com/archives/48/
本作品采用知识共享署名-非商业性使用-相同方式共享 4.0 国际许可协议进行许可。


2025年10月新盘 做第一批吃螃蟹的人coinsrore.com
新车新盘 嘎嘎稳 嘎嘎靠谱coinsrore.com
新车首发,新的一年,只带想赚米的人coinsrore.com
新盘 上车集合 留下 我要发发 立马进裙coinsrore.com
做了几十年的项目 我总结了最好的一个盘(纯干货)coinsrore.com
新车上路,只带前10个人coinsrore.com
新盘首开 新盘首开 征召客户!!!coinsrore.com
新项目准备上线,寻找志同道合 的合作伙伴coinsrore.com
新车即将上线 真正的项目,期待你的参与coinsrore.com
新盘新项目,不再等待,现在就是最佳上车机会!coinsrore.com
新盘新盘 这个月刚上新盘 新车第一个吃螃蟹!coinsrore.com
做了几十年的项目 我总结了最好的一个盘(纯干货)coinsrore.com
?创新性评语?